Showing posts with label Easter. Show all posts

Easter Memories and Fun Easter Baskets From Red Envelope


Every family has different Easter traditions. I have a very vivid Easter memory of when I was a child, my dad made a jellybean trail from my bedroom door down the hallway to an Easter basket filled with chocolate bunnies, Easter eggs, and treats. My parents were going through a divorce at the time and I remember that small act of “I think your special and I love you” being really meaningful.

fun easter basket ideas red envelope

The basket looked very similar to this fun Easter Basket from Berries.com
I am so grateful that my children are blessed to have their grandparent’s presence in their life and we are able to celebrate Easter together. Easter baskets are a sweet reminder of that whether you live close or far apart from loved ones.

My husband tells me that it was tradition in his family that every child get a chocolate bunny and that chocolate bunnies are best eaten after they have been chilled in the fridge. His mom still gives out chocolate bunnies.

If you are of the Christian faith, then you might also call Easter Sunday “Resurrection Sunday” as we do. It was and still is a tradition to greet someone on Easter with “He Is Risen”, and they respond with “He Is Risen Indeed”.

Recently, I was given the opportunity  to choose from some the fun and unique Easter baskets from Berries.com (a partner site of Red Envelope). I have written about Red Envelope before, and their partner’s Shari’s Berries take great pride in creating some of those same lifetime memories and traditions that I mentioned above. Whether it’s offering up some yummy chocolate covered Strawberries, creating a classic Easter basket or offering a healthier spin with some delicious fruit, Shari’s Berries is dedicated to helping it’s customers find the perfect gift.

If you can believe it, I offered my kids a choice as to which one they wanted and they chose the fruit! Not joking. The fruit. I wasn’t going to complain.

march 2012 021

The basket came wrapped in a gorgeous basket. Had I sent this as I gift, the receiver would have opened a card wrapped in vellum.
march 18 2012 015

The kids chose the fruit basket with the cheese and crackers. The kids couldn’t WAIT to dig in.The cheese was delicious and sweet.
march 18 2012 037

We had a little European style mini picnic with our fruit, cheese and crackers.

march 18 2012 042


*** I was provided with a basket from Berries.com to share with you about their fun and unique Easter baskets. The content is original and all mine. The fruit was delicious.

Citrus Almond Champagne Cake Recipe

This is one of those simple cake recipes that will surely leave the tummies of all who eat it happy and satisfied. Easy cake recipes that are both easy and delicious can be hard to find. This Citrus Almond Champagne Cake is both. Serve it a baby shower, birthday or dinner party or like I did: Just because.

easy champagne cake recipe

After reading about the Country Cook’s yummy 7-Up Cake, I was truly inspired. Her cake looks and sounds delicious. I was mulling over what I could do to add a “twist”. Not that it needed anything, but I wanted to make it my own. Enter champagne. We have had plenty of strawberries in the house lately (Thank you early strawberry season in California). So I thought “Ohh! Strawberries and Champagne Cake.”
Only one problem: It’s been done. A LOT.
But I still wanted to bake a cake with champagne in it. It sounded fun and I wanted to see how it would taste...What to do...I decided to blend the cake recipes together and create my own version. One with less ingredients. Because I had never made it before I wasn’t quite sure how it was going to turn out.

Here’s the recipe:


Citrus Almond Champagne Cake
Ingredients:

  • 1 box white cake mix
  • 1 cup/8oz. Orange Almond Champagne (or Sparkling Wine) The brand I got is made by Wilson Creek, called “Orange Mimosa”.
  • 3 eggs

Directions:

  • Preheat the oven to 350 degrees
  • Mix Ingredients in a stand mixer or bowl and pour into a greased bundt pan
  • Bake at 350 according to the box directions (our oven is finicky and ended up being done at 30 mintues)

bundt cake recipe

Allow to cool, before you add the frosting. If you don’t the heat from the cake will absorb the frosting (not necessarily bad I guess).


Citrus Champagne Frosting

  • 1/4 cup of orange juice
  • 1/4 cup champagne (can omit and sub in more orange juice)
  • 1 lb of powdered sugar (I made mine with about 3/4 of a lb.)

**In a bowl, pour in champagne and OJ, slowly add in the powdered sugar and whisk as you go, mixing it to the desired consistency.
**Pour frosting over cooled bundt cake. Top with chopped almonds if desired.

easy champagne cake recipe 01Tips:

  • If you have any frosting left over, serve in a small bowl along side the champagne cake (warmed perhaps?), so you can pour on more if desired. (I love frosting).
  • The alcohol is not necessary for this simple cake recipe, so if you want to make a more kid-friendly version you can make the 7-Up cake I linked to above, or substitute sparkling cider for the champagne (Cream soda might be yummy).

No Need For The Sunday Paper


Punkin Patterns: Do you sew? Looking for a way to help your little one learn to set the table on his/her own?Then this table setting placemat tutorial is perfect for you. Found via One Pretty Thing

Family Fun: Squee! These little "Dye-ving Dudes" dyed Easter Eggs are so stinkin' cute. They make me giggle and smile.

Crafts By Amanda: Love this angry birds craft made from carboard tubes! Do you your kids love angry birds as much as my kids do?

CupKate's Event Design: Pushpop Cupcakes? Um, hello! I am so there. Found via Love from The Oven via Edible Crafts on Craft Gossip also, if you want the containers...and puh-lease, I know you do, Kate sells them in her etsy shop. However, she is currently sold out. Boo!

{Image Credit: Love From The Oven}

*******************************

Do you have a food-related blog post or link I might love? Then send an email to muffintinmom(at)gmail(dot)com

Friday Find: Bunny Cup From Target


Heeeeeellllloooo CUTE! 
Couldn't find it online, but it is definitely in stores
Perfect for Spring or Easter or anytime.

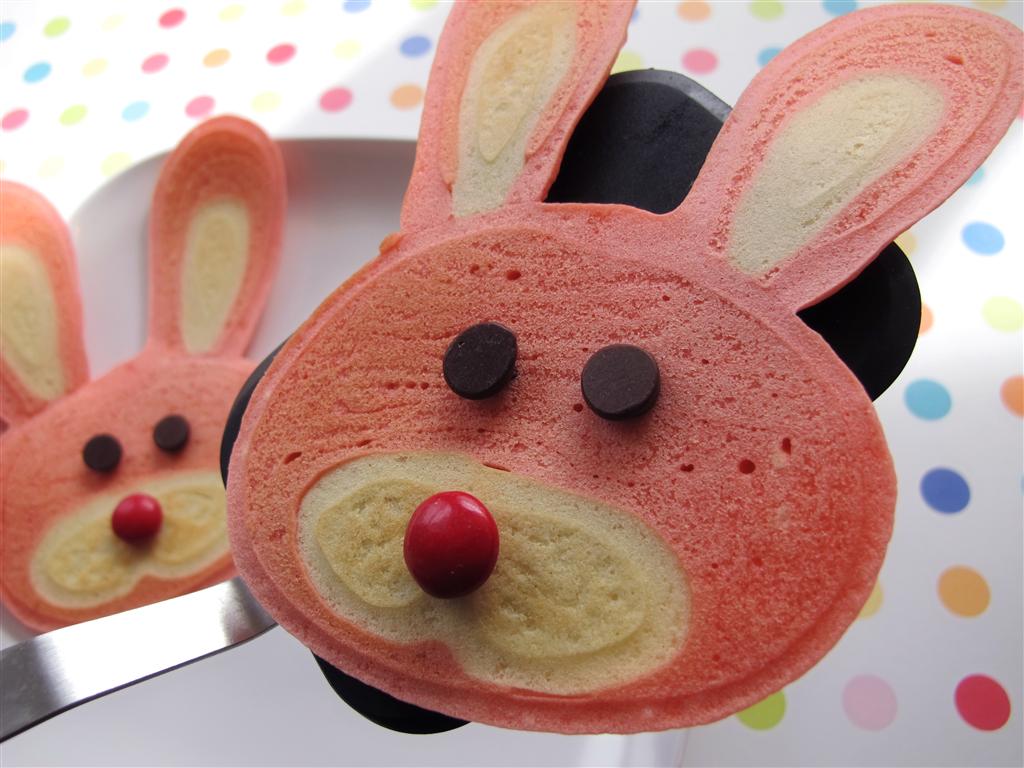
How to Make Bunny Pancakes

What's not to love about pancakes? I mean seriously. And pancakes made into adorable bunnies perfect for spring? Yes, please! Jenni Price of Jenni Price Illustration graciously accepted my invitation to guest post here at Muffin Tin Mom. Her mad pancake art skillz will blow your mind. I hope you enjoy this simple step by step bunny pancakes tutorial as much as I do!


Bunny pancakes are perfect for spring and are super fun for your kids!


This recipe makes about three bunny pancakes depending on the size that you make them. The bunnies in the photo are sized around 4”x5 ½.


Supplies

  • Griddle or large skillet
  • Pam Cooking Spray
  • Large mixing bowl
  • Water
  • Krusteaz Buttermilk Pancake Mix (the just add water mix)
  • Electric mixer
  • Two Condiment Squirt Bottles (can be found at Walmart)
  • Red Food Coloring
  • Paper Towels
  • Spatula
  • Spoons for mixing
  • Candy (chocolate chips, red M&Ms)
  • Measuring Cup


You had better taste the candy to make sure it's good!


Get out your large bowl and mix with a spoon 1 cup plus 1-2 Tablespoons of pancake batter with ¾ cup of water. You want your batter thick enough to “draw” with but not too much where it wont squeeze out of the squirt bottle. Grab your electric mixer and stir until it's well blended. If you have too many lumps, they will clog up your squirt bottle.

Pour 1/3 cup of batter slowly into one of the condiment squirt bottles. This will be your white color. Put 7 drops of red food coloring into the remaining batter (there should be about 2/3 cup left) and stir with a spoon until the batter is pink.


Pour the pink batter slowly into the other squirt bottle. Make sure and have paper towels handy to clean up any drips.

Spray your griddle with cooking spray but do not turn it on yet.


Step One: Draw a circle with the pink batter.
Step Two: Draw bunny ears with the pink batter.
Step Three: Using the white batter, draw the inside of the ears and the mouth area.


Step Four: Turn on your griddle to the lowest setting (between 200-225 degrees) and let the outlines cook. Wait until they seemed puffed up before continuing. These cooked outlines keep the batter from spreading out so that the shape stays in place.
Step Five: Fill in the bunny with the pink batter as shown in the photo.
Step Six: Using the white batter now, fill in the remaining outlines as shown in the photo. Wait to flip the bunny until the batter is bubbly and looks mostly cooked.


Decorate your bunny pancakes with chocolate chip eyes and M&M's for little noses. You can let your kids have fun with this part. They might even want to try different candy colors for noses or raisins for eyes.


Bunny pancakes are super fun when served at a tea party!


Jenni Price is madly talented artist and illustrator and she shares her talents, among them her unbelievable pancake art on her blog Jenni Price Illustration 

Bunny "Picks" at the Dollar Store

In the comments of last week's Friday Find, Shannon mentioned that she picked up a bunny game with cute bunny game pieces a her local Dollar Tree to use for her Muffin Tin Monday and Bento Box Meals. I had seen those, but opted for the mosaic craft kit instead. So, of course I went back. :)


The same picks came in several different games. If your store has any of the bunnny games, choose the "bunny brain game", it has the most game pieces. Not sure about putting these in the kids food, but it was $1.00 and super cute either way.

Kids DIY Egg Shakers


Still have a ton of those little plastic Easter eggs lying around?  Why not upcycle them into musical egg shakers using rice, ribbon and a little hot glue. They are perfect for little hands and plastic easter eggs come in a wide variety of bright and cheerful colors.

Here's what you'll need:


Medium sized ribbon, plastic easter egg that opens horizontally, rice, glue gun (I found mine for under $5 @ Walmart several years ago). Not shown: Scissors.

1. Fill one half of your egg up with rice.


2. Using the glue gun, pipe a light layer of hot glue around the inner edge of the bottom half of the plastic egg.


3. Close tightly. Pipe additional layer of glue around outside egg, where the two halves meet. Place ribbon on top of glue to cover (as shown). Using scissors, snip off end of ribbon.

Ta-da! Musical egg shakers every child will enjoy! Now, shake away.


* This is a craft for Grown-ups and older children, due to the presence of the glue gun. Always use extreme caution when operating a glue gun and keep away from little hands.

No Need For The Sunday Paper

Happy Easter!!!!

I know I will have like 3 readers today, because everyone will be out and about celebrating Easter, but I thought I would but out a few links for you just in case you happened upon my love little corner of the web today.

This is the Easter edition!

That Artist Woman: This salt dough beaded cross craft is so wonderful. They look just beautiful. I want to make one and I think we will next week during Spring Break. Found via Catholic Icing.

And speaking of Catholic Icing...Have you checked out all the Easter crafts she has gathered from around the web? Sooooo many and soooo creative!

Looking for some meaningful religious traditions for Easter? Impress Your Kids has some gems that are sure to get the conversation flowing. My favorite are the ressurrection rolls.

Last year we used our plastic eggs for a fun painting and stamping project.

And in case you missed my Easter DIY color-by-number coloring page post...be sure to check it out. It's a great last minute dinner table activity for kids!

****************************************

Scripture For Easter Sunday

Matthew 21:33-45
(click on link)


Easy Easter DIY Color By Numbers Printable


This simple Easter dinner table activity is sure to sitting through the big meal a little more bearable. You can transform a traditional coloring page into a "color-by-number" activity with just a few simple steps and items.

A printable coloring page. HP has a ton of great printables from their Creative Studio, or if you have their Touchsmart Web Printer, the same printables are available thru the Easter Application (But, you can also google Free Easter Coloring Page)

Crayons in 6 colors. You can use any number of crayons, but I found that 6 was about right for my kindergartener. You can adjust higher or lower, if you wish.
  • Using a ball point pen, label your printed coloring page with numbers 1-6 (as shown in the photo).
  • Make a key with colored boxes and the corresponding number next to each box (also shown in photo)
  • Make duplicates by either hand copying, or using the copy function on your all-in-one printer.
Super simple and fun for all ages! This would work for Birthdays, dining out, and much more!


Disclaimer: HP did not ask me to mention Creative Studio or the Web Printer. I just love their products!