


How to Make Bunny Pancakes
What's not to love about pancakes? I mean seriously. And pancakes made into adorable bunnies perfect for spring? Yes, please! Jenni Price of Jenni Price Illustration graciously accepted my invitation to guest post here at Muffin Tin Mom. Her mad pancake art skillz will blow your mind. I hope you enjoy this simple step by step bunny pancakes tutorial as much as I do!

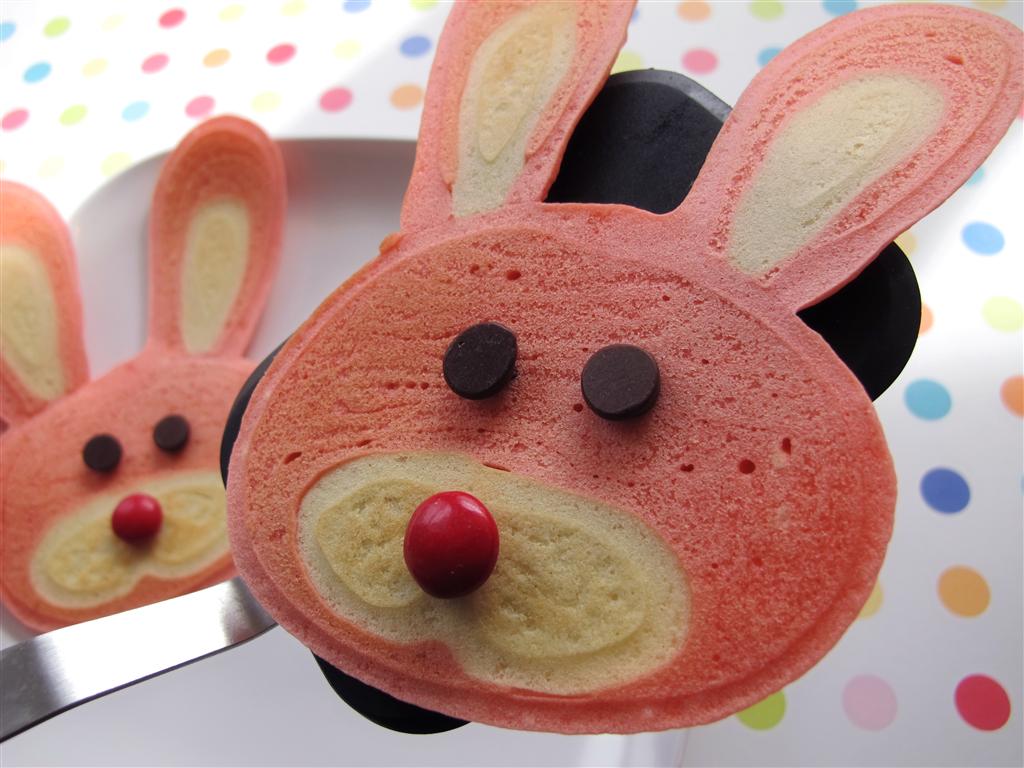
Bunny pancakes are perfect for spring and are super fun for your kids!

This recipe makes about three bunny pancakes depending on the size that you make them. The bunnies in the photo are sized around 4”x5 ½.

Supplies

You had better taste the candy to make sure it's good!

Get out your large bowl and mix with a spoon 1 cup plus 1-2 Tablespoons of pancake batter with ¾ cup of water. You want your batter thick enough to “draw” with but not too much where it wont squeeze out of the squirt bottle. Grab your electric mixer and stir until it's well blended. If you have too many lumps, they will clog up your squirt bottle.
Pour 1/3 cup of batter slowly into one of the condiment squirt bottles. This will be your white color. Put 7 drops of red food coloring into the remaining batter (there should be about 2/3 cup left) and stir with a spoon until the batter is pink.

Pour the pink batter slowly into the other squirt bottle. Make sure and have paper towels handy to clean up any drips.
Spray your griddle with cooking spray but do not turn it on yet.

Step One: Draw a circle with the pink batter.
Step Two: Draw bunny ears with the pink batter.
Step Three: Using the white batter, draw the inside of the ears and the mouth area.

Step Four: Turn on your griddle to the lowest setting (between 200-225 degrees) and let the outlines cook. Wait until they seemed puffed up before continuing. These cooked outlines keep the batter from spreading out so that the shape stays in place.
Step Five: Fill in the bunny with the pink batter as shown in the photo.
Step Six: Using the white batter now, fill in the remaining outlines as shown in the photo. Wait to flip the bunny until the batter is bubbly and looks mostly cooked.

Decorate your bunny pancakes with chocolate chip eyes and M&M's for little noses. You can let your kids have fun with this part. They might even want to try different candy colors for noses or raisins for eyes.

Bunny pancakes are super fun when served at a tea party!

Jenni Price is madly talented artist and illustrator and she shares her talents, among them her unbelievable pancake art on her blog Jenni Price Illustration
Bunny pancakes are perfect for spring and are super fun for your kids!

This recipe makes about three bunny pancakes depending on the size that you make them. The bunnies in the photo are sized around 4”x5 ½.

Supplies
- Griddle or large skillet
- Pam Cooking Spray
- Large mixing bowl
- Water
- Krusteaz Buttermilk Pancake Mix (the just add water mix)
- Electric mixer
- Two Condiment Squirt Bottles (can be found at Walmart)
- Red Food Coloring
- Paper Towels
- Spatula
- Spoons for mixing
- Candy (chocolate chips, red M&Ms)
- Measuring Cup

You had better taste the candy to make sure it's good!

Get out your large bowl and mix with a spoon 1 cup plus 1-2 Tablespoons of pancake batter with ¾ cup of water. You want your batter thick enough to “draw” with but not too much where it wont squeeze out of the squirt bottle. Grab your electric mixer and stir until it's well blended. If you have too many lumps, they will clog up your squirt bottle.
Pour 1/3 cup of batter slowly into one of the condiment squirt bottles. This will be your white color. Put 7 drops of red food coloring into the remaining batter (there should be about 2/3 cup left) and stir with a spoon until the batter is pink.

Pour the pink batter slowly into the other squirt bottle. Make sure and have paper towels handy to clean up any drips.
Spray your griddle with cooking spray but do not turn it on yet.

Step One: Draw a circle with the pink batter.
Step Two: Draw bunny ears with the pink batter.
Step Three: Using the white batter, draw the inside of the ears and the mouth area.

Step Four: Turn on your griddle to the lowest setting (between 200-225 degrees) and let the outlines cook. Wait until they seemed puffed up before continuing. These cooked outlines keep the batter from spreading out so that the shape stays in place.
Step Five: Fill in the bunny with the pink batter as shown in the photo.
Step Six: Using the white batter now, fill in the remaining outlines as shown in the photo. Wait to flip the bunny until the batter is bubbly and looks mostly cooked.

Decorate your bunny pancakes with chocolate chip eyes and M&M's for little noses. You can let your kids have fun with this part. They might even want to try different candy colors for noses or raisins for eyes.

Bunny pancakes are super fun when served at a tea party!

Jenni Price is madly talented artist and illustrator and she shares her talents, among them her unbelievable pancake art on her blog Jenni Price Illustration
Popularized by : OTYLIA - SEO Friendly
 You are reading the article instinct blogs - SEO Friendly entitled How to Make Bunny Pancakes, We are sorry if you think there is a very important artike, do not forget to subscribe by entering your email in column Get Updates Via Email. If there is a question which if you think do not forget to leave a comment below. Without any spread of SPAM..


Post a Comment