
Showing posts with label Valentine's Day. Show all posts

Folded Cupcake Liner Flower

I am swimming in cupcake liners over here! Being the Muffin Tin Mom, I have a plethora of muffin and cupcake liners. I am always thinking up fun ways to use them “outside the tin”. Yesterday, Muffin Tin Girl performed in a "Reader's Theater" at school. Every young performer deserves flowers after a good performance. So, I made her a little Folded Muffin Cupcake Liner Flower.

FEb 17 2012 049
After school when she came home, she wanted to make one of her very own folded cupcake liner flower. So, we did. I was very careful to explain how hot glue works. It was definitely a moment I will never forget as I remember the first time I used a hot glue gun with my mom. We worked together to create her flower, folding the muffin liners around a paper circle and adding a button.

FEb 17 2012 065

Proud of her work.

paper cupcake liner flower

I attached an alligator clip to the back using hot glue, so she could put it in her hair.

folded paper cupcake liner flower


If there was a bonus, it would be that the pack of muffin liners was $1 at Dollar Tree. The clips were around $2.99 at Michaels (without a coupon), so with the items I had on hand, this project was around $2-4.


I cannot take credit for this idea. I was inspired by a several posts:


This paper pinwheel flower craft would make a great Girl Scouts group activity or Mother’s Day craft.

Muffin Tin Monday Valentines 4.0

Hi Muffin Tin Meal 'ers! It's Monday and around here, that means it's Muffin Tin Monday. This year will mark the 4th Valentine's Muffin Tin Monday Blog Link Up!. Wow!


From the first year....


This week's unofficial theme is VALENTINE'S DAY

I made 2 more Valentine's inspired MTM's over the last few weeks. 

As I was planning my muffin tin meal this week, I just sort of happened to make a leftovers muffin tin meal. I guess I should have used the Muffin Tin Meal Planner! Ha! 

So, I leave you with the muffin tin meal above from a week or so ago and this one, just for fun. I used paper cups from Marths Stewart (remember the preview?)


In this muffin tin meal: bananas, carrots, pesto chicken, red peppers, chex cereal, and cucumber slices.

This week, we also made super easy cupcake liner Valentines


Now it's your turn!

Easy Valentines Craft Paper Liner Hearts


We made simple paper cupcake liner Valentines for an easy Valentine's Day craft.  


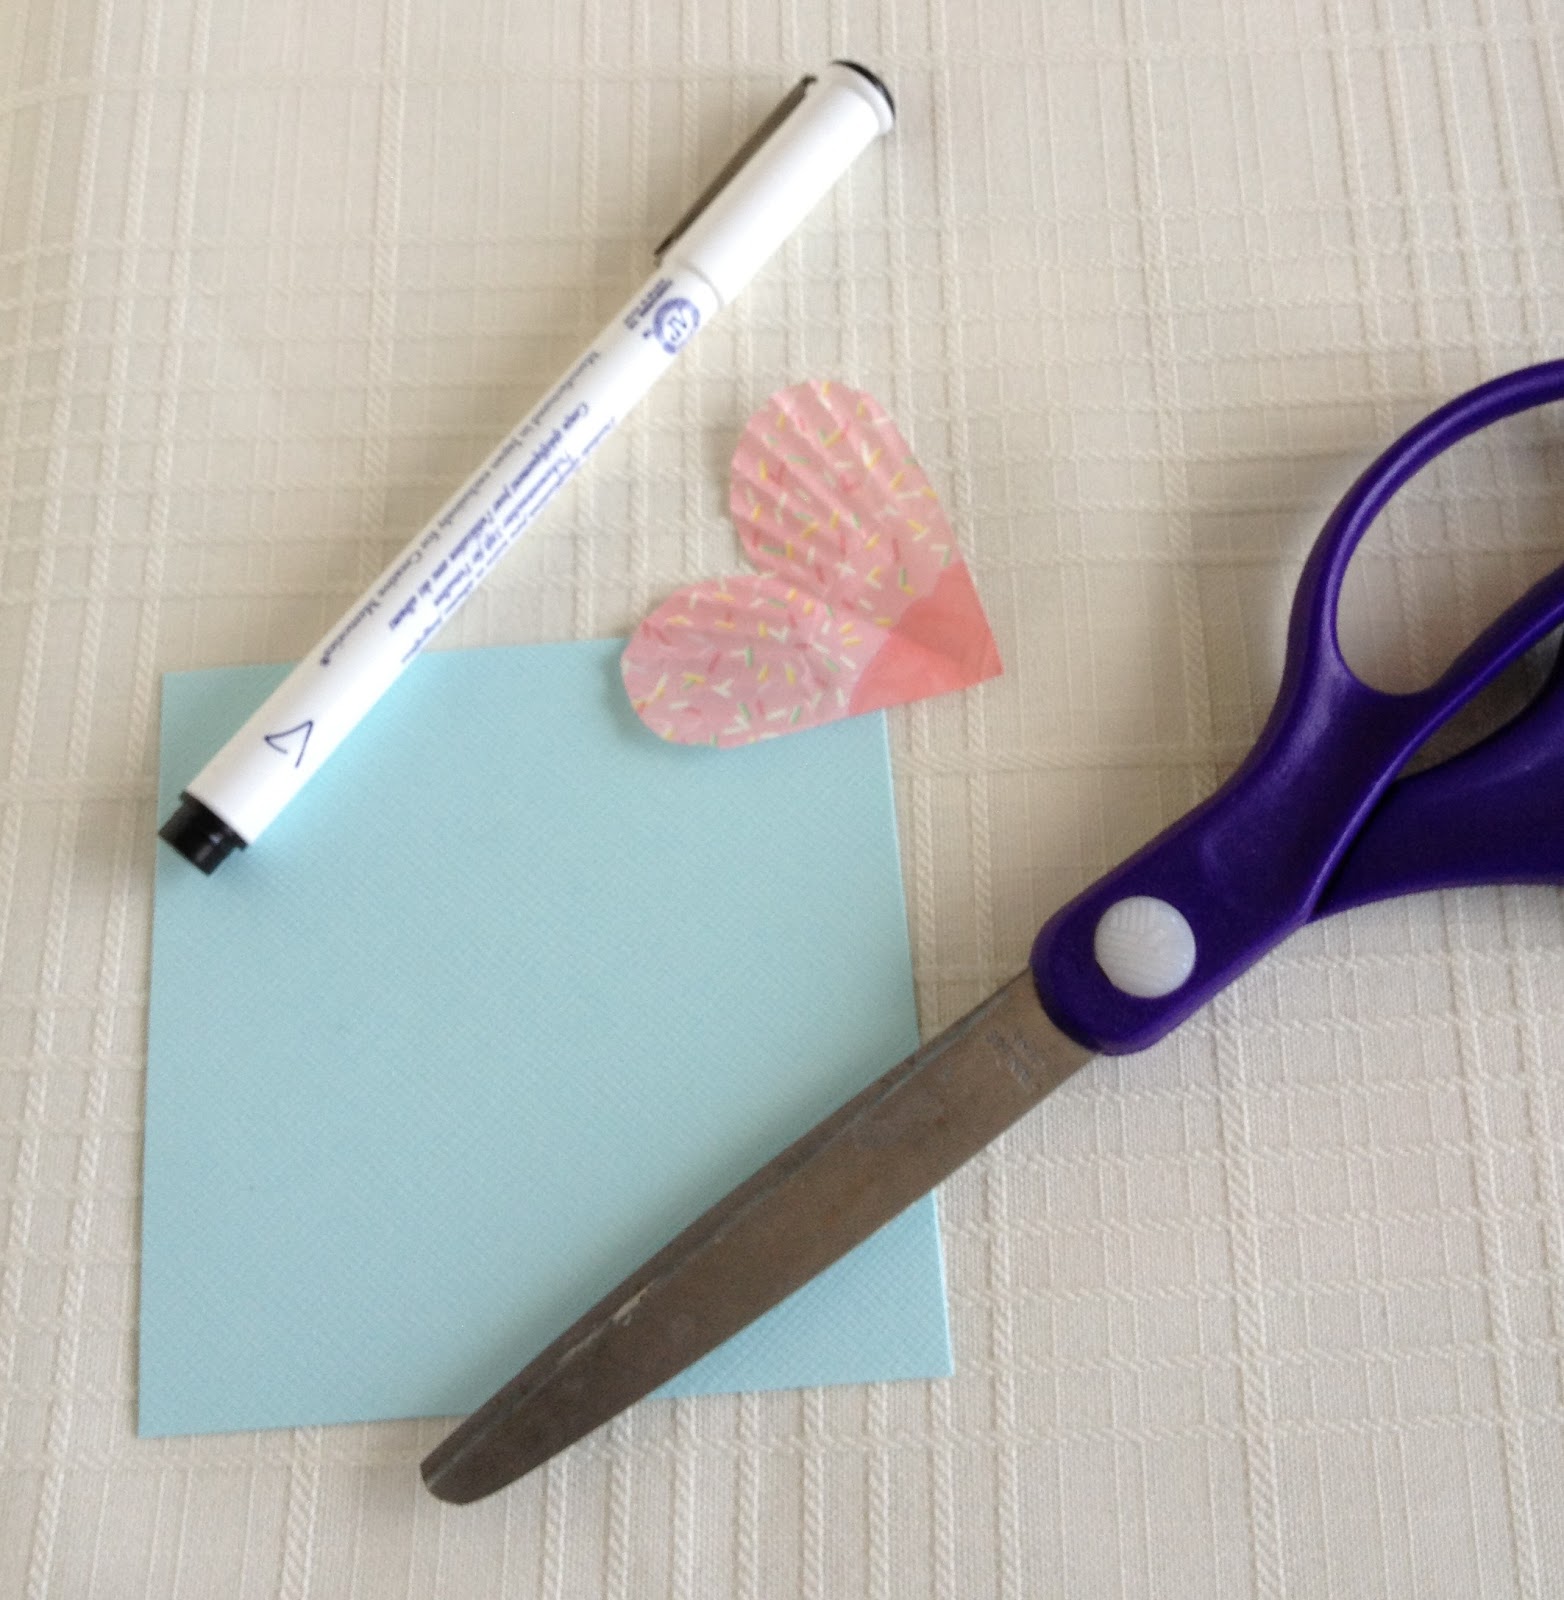
You'll need paper muffin cups or cupcake liners. I chose these adorable ones from the Martha Stewart Collection at Michael's Arts and Crafts. To make a heart, simply fold your liner in half several times until you get a triangle and round the edge with scissors. Open it up and cut along the folds.


Cut a bunch of hearts out...


Gather paper, a pen, adhesive/glue, and your hearts.


Glue your heart on and write a message to a special someone for Valentine's Day or any day.


Super simple.

http://topichealthnews.blogspot.com/

Then start crying when your daughter hands you this...

**These photos are the property of Muffin Tin Mom and any use or misuse of them without my permission is prohibited. It's perfectly fine to mention the craft on your blog or pinterest, but you must credit this blog if you do.

Muffin Tin Monday - Valentine's Day


Welcome to Muffin Tin Monday. Today is Valentine's Day and you would think it's Christmas what with all the anticipation. The kids have been cheerily counting down to today's festivities and I for one couldn't love it more.

Here is the love-ly Valentine's Day themed MTM I made.


In this "tin": Strawberry yogurt, with heart shaped sprinkles, craisins, heart-shaped toast, bananas with heart shaped picks.

Heart shaped cups are made by Wilton. :)

Now it's your turn. Did you make a Muffin TIn Meal? Won't you share it with us? Click on the blue "add your link" button to submit your blog post or photo.


My Muffin Tin Necklace: One Of Life's Little Luxuries


I wear my Muffin Tin Necklace everywhere.

I can't get enough of it. I smile as I put it on each morning. And if you follow Muffin Tn Meals on facebook, you will know that I have been gushing about this necklace for some time and was so excited when Muffin Tin Dad surprised gifted me with for my birthday.

Photos property of Luxe Adornments

If you love Muffin Tin Monday as much as I do, I know you will want one of these for yourself. Recently,  I shared with Tambra of Luxe Adornments about MTM and how I thought my readers would love her exceptional jewelry as I do. Well, I am pleased to announce and welcome Luxe Adornments as a sponsor to Muffin Tin Mom! You'll see their spot on my sidebar now and I hope you will check them out.


Luxe Adornments has so many other gorgeous pieces of jewelry. You should know that all of their pieces are handcrafted and yet are affordable enough you won't break the bank. Their tagline of "Little luxuries for everyday life." is so true! I love that I can transition through my day - from play dates to dinner dates wearing these pieces without sacrificing on style.


Luxe Adornments doesn't forget those fine finishing touches and attention to detail. Each piece is delicately wrapped in beautiful packaging that is perfect for gift giving or receiving on Valentine's Day or any occasion!

Welcome to Luxe Adornments!

Valentine's Day Easy Foam Heart Craft


Valentine's Day is fast approaching! This year I decided that I would again help the kids make unique handmade Valentines for their classmates. But I wanted to keep it simple. Large foam hearts and foam sticker buckets are on sale at Michael's this week for $4.99 so we scooped up a pack to make these easy Foam Heart Craft Valentines.


 With a few extra items like scissors, craft paper, and glue, we had a bunch of Valentines made in no time!


More Valentine's Day ideas:

Cookies From Cake Mix


Cookies From Cake Mix

I get requests for this simple cookie recipe all the time and when you taste them, I know you will just love how good they are. There are a lot of variations of this particular recipe, but this one is the most simple and tastiest that I have made. I would love to hear how you like them too!


Ingredients:

  • 1 box any variety, any flavor cake mix (I like Betty Crocker yellow cake, chocolate (pictured), or spice cake)
  • 2 eggs
  • 1/4 cup vegtable oil (canola works fine too)


Directions:

  • Preheat oven to 350 degrees
  • Mix together in a bowl until dough forms
  • Scoop spoonfuls into bowl of granulated sugar
  • Place 1 inch apart on ungreased cookie sheet.
  • Bake at 350 degrees for 10 minutes.
  • Remove and let stand for a few minutes


*Tips- I cover my baking sheet with foil or parchment paper to reduce clean up,
I role my my spoonfuls of dough in sugar, but that is an optional step (it makes them look pretty too!)
And I find that if I remove them from the oven right at the 10 minute mark, they are softer and more chewy.

*This post was previously published on September 13, 2008 on this blog and is reprinted with permission.

Muffin Tin Monday - Theme: Color Series Red/Valentine's

Happy Monday! I realized that this week might also have been a great opportunity to have done a Presiden't DAy theme. So, if you did that, wonderful!

Here's what we did!


Our tin, or liners this time around consisted of: Strawberries, Diced Red Peppers (this will be be our 8th time introducing this food), Cream Cheese on Heart Shaped Bread with a dab of frosting on top.
I faked out my daughter pretty good with the cream cheese and bread, she tought it was a cookie!


What did you do for Muffin Tin Monday? Won't you share it with us? Leave the url to your blog post or photo in the form below.

Heart Flower Lollipop


This sweet lollipop heart flower is simple to make and sure to bring a smile to anyone who recieves it. Why not make a few this spring for a special someone?

When I say simple, I mean reeeeeally simple.

You'll need:
  • Heart Die Cuts- about 2-3 inches in size (or hand cut them out too)
  • Small Lollipop (dum-dums and charms lollies from The Dollar Tree are the perfect size)
  • 4 inch Leaves (cut out using my paper flower tutorial)
  •  1/8 inch hole punch (see below)
  • Ribbon

 
this is the 1/8 in punch. super teensy.
 
How to:
  • Gather the heart and leaves together, punch a hole through each piece at the bottom of the heart andone end of the leaf.
  • Thread them through the end of the lolly, pushing them all the way untill the paper meets the lolly.
  • Fan the hearts and leaves out to make a flower.
  • To hold in place, tie a ribbon under the paper.
 

Tip/Hints:
  • my flowers were exactly 2 1/4 inches size (cut from my cricut)
  • Don't have lollipops? Use a chenille pipe cleaner instead and attach a pom-pom to center of flower.
  • PERFECT for Valentines Day, Mother's Day, or any special occasion!

Valentine's Preschool Activity


I'm over at Blissfully Domestic with a Guest Post on a simple Valenitne's Day Conversation Heart Tracing Activity
So simple. Check it out!


Valentine's Day Game For Kids: Guess How Many


Who first came up with the idea to put things in a jar and guess "How Many"? Well, whoever they were must have had kids. This activity is perfect for little and big minds alike. Here are some early concepts guessing How Many promotes: 
  • Introduction into estimation (we first estimated how many we thought were in the jar)
  • Team work (we talked over our answers)
  • Decision making ( we made a decision as to how many and wrote it down)
  • Counting (counted out loud together all the lollies in the jar)
  • Togetherness (we did the activity as a family, encouraged the importance of being happy for the winner, and shared our winnings)
Analyzing...


Guessing and Writing...

There were 22 lollies in the jar.

Friday Find: Cupcake Divided Plate From Target


Don't you just adore this divided cupcake plate? Such cuteness! These can be found at Target right now for around $2.00 according to Stephanie of A Pocket Full Of Buttons. And they have blue ones for boys! Ack! I want some.

Valentine File Folder Sight Word Match Up


I made this simple file folder matching activity for the Muffin Tin Girl today. She is learning sight words right now and I thought this would be a simple way to practice and reinforce what she is learning in school.
To make this you will need a few items you may or may not have on hand:
  • 8 1/2 by 11" Manilla Folder
  • Black Marker
  • Glue Stick/Adhesive
  • Heart Die Cuts or Heart hand cut from construction paper
  • Con-tact paper for laminating (optional)

    Divide hearts in half ( I used two sets of fourteen). Adhere one set of hearts to the inside of the folder. Write desired sight words on each heart. Copy the same sight words onto the second set of hearts. Now your child can match one set of hearts to the other. Laminate if desired.


How to Make A Clay Heart Necklace (For Kids And Grown Ups!)


My new crafty love is clay. Clay is great for little hands. Your little one can pound it and smush and mold it into different shapes. There are some you can bake and some that air dry, Some come in different colors and some come ready to paint. Today we made heart necklaces out of clay. We painted them and even through on a dash of modpodge and glitter. This is a great activity to do together with your child. Muffin Tin Girl and I now have "matching" clay heart necklaces (hers is white and mine is pink). And Muffin Tin Boy made me a special keepsake heart.

Clay heart necklaces are simple to make. However, there are a few tips and tricks to be aware of. The first being: Don't expect perfection. Clay is a fickle thing. Just the slightest touch by a hand can change it's shape. Use a gentle touch, however, if you are doing this with kids, just let them do whatever. Seriously, you won't win.

You'll need a few things to make this project:


  • Clay - the kind you bake (ON SALE until Saturday at Michaels for 88 cents)
  • Cookie Cutter in heart shape (mine happens to be the kind for cake fondant)
  • A knitting needle, toothpicks, and a Plastic or metal roller (grey - pictured above)
  • A necklace chain (I found a small ball chain necklace at Michaels, but I know Etsy.com sells them too)
Here's how:

1. According to the clay package directions, knead the lump of clay for 2 minutes. My kids loved this part.


(this is my "fake" kneading picture :) )

2. Roll out the clay so it is around 1/4 to 1/2 inch. Using the shape cutter, punch out a heart. You want it to be thick enough to make a hole in the side.


3. Be careful not to smoosh the heart too much (with kids this may be impossible to control). Poke a knitting needle or toothpick through the side (Doing it through the top is much easier, and might work better for younger kids, but doesn't lay as flat). This is important: Make sure the hole is large enough for a chain to fit through before you bake it!


4. Bake according to package directions: Typically 15 minutes at 275 degrees. Let cool completely before handling.

5. Paint as desired. If you buy the clay colored, you can skip this step. It does come in a rainbow of colors, but my kids liked painting it.

Optional step: add light coat of Mod Podge decopauge glue and sprinkle on some glitter. Below is an example of the hole at the top of the heart.

6. Let dry, string the completed heart on a necklace chain and wear with pride and when people compliment you on the necklace, you can say "My son/daughter made it!" or "I made it!".


Chocolate Covered Candy Cane Hearts


Do you have leftover candy canes from Christmas? Have you seen them on sale for next to nothing at your local grocery store? Buy them all up. Because you will want to make this delicious treat after you read how simple these are to make.

 
You'll need a few simple ingredients:
  • Candy Canes (any size will do, I made mine with the large kind)
  • Parchment Paper or Silicone Baking Making
  • Melting Chocolate/Candy Coating (I used CandiQuick Brand)
  • baking sheet/bowls
  • Sprinkles (optional, but I think they add texture and visual interest)


Simple ingredients plus simple instructions make this a perfect activity to with kids. However, be prepared with large enormous amounts of patience as it can be very messy fun! Make sure to prep your work area and melt the chocolate before the kids get involved. You might also consider melting the candy canes together to make the hearts to cut down one step, but it's up to you. The Muffin Tin Kids kept sneaking bits of sprinkles when I wasn't looking!

 
Here's how to make it happen:


To make candy cane hearts :
(Based on a recipe from Skip To My Lou)
  • Preheat oven to 300 degrees
  • Line a baking sheet with parchment paper or a silicone baking mat
  • Lay to candy canes together, rounded edges facing in, tips touching to make a heart shape.
  • Bake at 300 degrees for 3-4 minutes (keep an eye on it)
  • Remove from oven, let cool completely.
  • DO NOT line your baking sheet with foil (as shown). The heart will stick to the foil and it will be a MESS. Use the parchment paper. Trust me. The heart may flatten during/just after baking. I liked it this way as they are easier to eat. :)
To cover the hearts with chocolate:
  • Line another, separate baking sheet with parchment paper (This is where you will set the choc. covered candy canes out to dry/harden).
  • According to package directions, melt chocolate in microwave for 1 minute (some come w/ shallow microwavable dishes).
  • Hold the heart in one hand over bowl of melted chocolate and spoon it onto the heart. Once it is all but covered, lay it on the parchment paper. Drizzle chocolate over any uncovered spots.
  • Cover with sprinkles a will.
  • Note: putting the covered hearts in the fridge/freezer will speed up the hardening process.
Tips and hints:
  • If you will be making these with kids, be sure to have their full attention and use short, clear directions. Printing out this tutorial might even help, so they know what to expect.
  • Be careful with melted chocolate around children. It can be very hot. That's part of the reason we used spoons.
  • The melted candy coating will get everywhere and when dry, it hardens on surfaces, be prepared by lining your workspace or have a wet towel handy to quickly wipe up spills.
  • Baby wipes are your friend.
  • Apparently, kids believe there can never be enough sprinkles. Have ample supply on hand.

(Here is Muffin Tin Boy's creation. I swear there are candy canes underneath all that mess!)
Enjoy!

(My first attempt at making the hearts was a serious Food Fail. More on that later.)